Managed Kubernetes on Proxmox with CAPI and Kamaji
Build a managed Kubernetes service on Proxmox using Cluster API and Kamaji for hosted control planes.
⚠️ If you are new to Cluster API (CAPI) ↗, please refer to my previous article, Build your own Managed Kubernetes Service on Proxmox with CAPI, for a detailed introduction.
Prerequisites#
For this lab you need to bring with:
- a single-node or even better a multi-node Proxmox ↗ cluster. Installing and configuring the Proxmox cluster itself is out of the scope of this article.
- Relevant hands-on experience on Proxmox and Kubernetes.
- Relevant hands-on experience with CAPI.
- A workstation with homebrew, kubectl, clusterctl ↗.
- A virtual machine with k3s ↗ (4 vCPUs, 6GB RAM no ballooning) for implementing the Kamaji part of the lab (In this case, the management cluster cannot be illustrated using kind ↗, unlike in the previous article.
⚠️ This lab requires Proxmox version
8.4.12. Earlier versions exhibit issues with the integration with the CAPMOX ↗ provider, and later versions have not been tested by this guide.
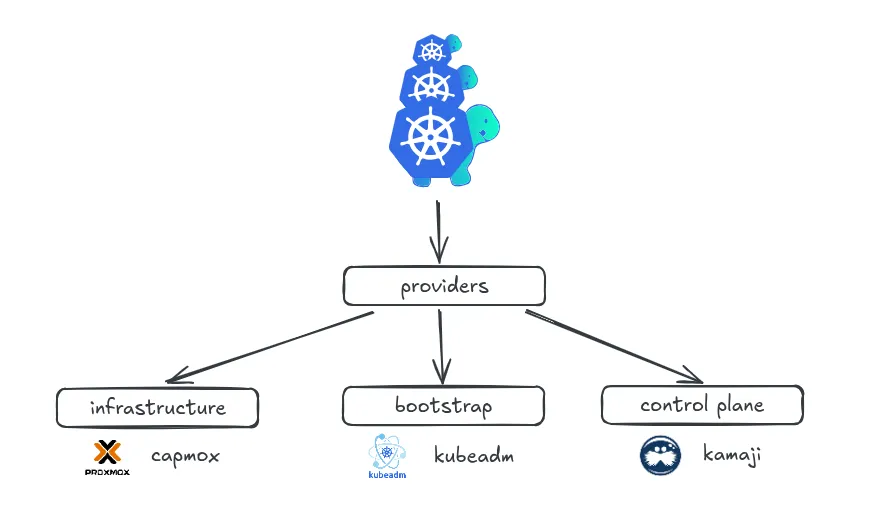
In this lab we are going to demonstrate how you could create your own Managed Kubernetes Service using CAPI with Proxmox as infrastructure provider, kubeadm ↗ as bootstrap provider and for the role of control plane provider we are going to use Kamaji ↗.
What is Kamaji?#
Kamaji ↗ is an open-source project developed by Clastix ↗ that implements the Kubernetes control plane as a hosted service running entirely on Kubernetes itself. Instead of provisioning dedicated virtual machines or bare-metal servers for etcd, kube-apiserver, the controller manager, and the scheduler, Kamaji runs these components as Pods within a management cluster and exposes them to tenant clusters through a lightweight API. This hosted control plane model decouples control plane lifecycle management from the underlying infrastructure, significantly reducing operational overhead and resource duplication.
Under the hood, Kamaji introduces two new API groups. The TenantControlPlane resource, which defines the desired configuration for a control plane: Kubernetes version, certificate settings, replica count, scheduling constraints and exposure method (ClusterIP, LoadBalancer or NodePort). Separately, a DataStore resource manages the backing store for one or more tenant control planes, which is by default etcd ↗, but optionally other better scaling alternatives such as MySQL, PostgreSQL or NATS (via Kine) can used as a replacement.
Preparing your Proxmox Users and API Tokens#
❗️You can skip this section if you have already completed the setup by following the steps outlined in the previous article.
Before we can build images, the image-builder needs permission to interact with your Proxmox environment through its API. This access allows it to launch a virtual machine, perform the build process, and then turn that VM into a reusable template. Execute the following command in one of your Proxmox nodes:
pveum user add image-builder@pve
pveum aclmod / -user image-builder@pve -role PVEAdmin
pveum user token add image-builder@pve capi -privsep 0
pveum user add capmox@pve
pveum aclmod / -user capmox@pve -role PVEAdmin
pveum user token add capmox@pve capi -privsep 0Building Images for Proxmox with image-builder#
‼️Given that this is a quite lengthy configuration step, and to avoid cluttering the article or making it unnecessarily long, please refer to the corresponding section in the previous article, if you have not already completed it. Otherwise, you can safely skip this step.
Installing Prerequisites#
To maintain a single guide for both macOS and Linux, we’ll use Homebrew ↗ to install the binaries required for managing the cluster.
1️⃣ Install Homebrew
/bin/bash -c "$(curl -fsSL https://raw.githubusercontent.com/Homebrew/install/HEAD/install.sh)"Follow the instructions of the installer, to complete the installation.
2️⃣ Install kubectl
brew install kubectl3️⃣ Install clusterctl
brew install clusterctl⚠️ This lab requires clusterctl version
v1.11.3or later.
The clusterctl CLI delivers a streamlined “day one” experience for CAPI by automatically retrieving and installing the necessary provider manifests. It embeds recommended best practices for provider management, helping you avoid mis-configurations and simplifying tasks like upgrades.
Built on top of clusterctl, the Cluster API Operator is a Kubernetes operator that brings a fully declarative workflow for managing provider lifecycles within your management cluster. It enhances the deployment and day-to-day operation of Cluster API, making routine tasks and GitOps-driven automation effortless.
Create Configuration for Proxmox#
Create a a file named capmox.env, and fill it in with the following content:
export PROXMOX_URL="https://<PROXMOX_NODE_IP>:8006"
export PROXMOX_TOKEN='capmox@pve!capi'
export PROXMOX_SECRET="<CAPMOX_API_TOKEN_SECRET>"
export PROXMOX_SKIP_TLS_VERIFY="true"Replace every occurrence of
<PROXMOX_NODE_IP>with the IP address and CIDR corresponding to your bridge interface (vmbr0, for this lab).
Do the same for
<CAPMOX_API_TOKEN_SECRET>, using the appropriate value for your environment.
Setting up a Management Cluster#
This is the cluster that runs one or more Infrastructure Providers and holds resources (for example, Machines), when provisioning multiple workload clusters.
⏩ SSH into the virtual machine that will host the K3s cluster.
1️⃣ Create the cluster
curl -sfL https://get.k3s.io | INSTALL_K3S_EXEC="--disable traefik --disable servicelb" sh -

sudo chmod 644 /etc/rancher/k3s/k3s.yaml
sudo cp /etc/rancher/k3s/k3s.yaml ~/.kube/config
sudo chown <USER>:<USER> ~/.kube/configReplace
<USER>with the appropriate user and group for your environment.
If the management cluster is running on a different virtual machine, copy ~/.kube/config to your bootstrap machine where the required prerequisites (Homebrew, kubectl, and clusterctl) are already installed.
Make sure you change the
servervalue fromhttps://127.0.0.1:6443to the IP address assigned on the network device that uses the bridgevmbr0.
⏩ Switch now to your bootstrap machine.
2️⃣ Install Cert-Manager
Kamaji relies on Kubernetes dynamic admission control mechanisms, including validating and mutating webhook configurations. These webhooks communicate over TLS, with certificates managed by cert-manager ↗, which therefore must be installed as a prerequisite.
helm repo add jetstack https://charts.jetstack.io
helm repo update

helm install \
  cert-manager jetstack/cert-manager \
  --namespace cert-manager \
  --create-namespace \
--set installCRDs=true3️⃣ Install the Kamaji Operator
helm repo add clastix https://clastix.github.io/charts
helm repo update

helm install kamaji clastix/kamaji \
    --version 0.0.0+latest \
    --namespace kamaji-system \
    --create-namespace \
--set image.tag=latest4️⃣ Install MetalLB
⚠️ Kamaji provisions the control plane as a set of Pods exposed through a Service. This Service must be assigned an IP address within the network defined by the
vmbr0interface so that it is reachable by worker nodes and by consumers of the cluster. For this reason, a solution such as MetalLB ↗ is required. Other alternatives may also be suitable; e.g., kube-vip ↗ or klipper ↗ the embedded K3s service load balancer which in our case would mean you need to reinstall the cluster, since it was provisioned without Traefik and Klipper.
kubectl apply -f https://raw.githubusercontent.com/metallb/metallb/v0.14.3/config/manifests/metallb-native.yaml

kubectl apply -f - <<EOF
apiVersion: metallb.io/v1beta1
kind: IPAddressPool
metadata:
  name: default-pool
  namespace: metallb-system
spec:
  addresses:
  - 192.168.1.240-192.168.1.250
---
apiVersion: metallb.io/v1beta1
kind: L2Advertisement
metadata:
  name: default-advertisement
  namespace: metallb-system
spec:
  ipAddressPools:
    - default-pool
EOF️Replace the IP address pool range, in this case
192.168.1.240–192.168.1.250, so it matches your environment. Ensure that the selected IP range belongs to thevmbr0interface network.
5️⃣ Transform the cluster to a Management Cluster
With clusterctl installed and prerequisites satisfied, run clusterctl init to convert your Kubernetes cluster into a management cluster.
source capmox.env

clusterctl init \
  --infrastructure proxmox \
  --ipam in-cluster \
--control-plane kamajiThe command above will install Cluster API Provider for Proxmox VE ↗ (CAPMOX) as infrastructure provider, Kubeadm as bootstrap provider and Kamaji as control-plane provider.
Creating a Cluster with the Kamaji CP Provider#
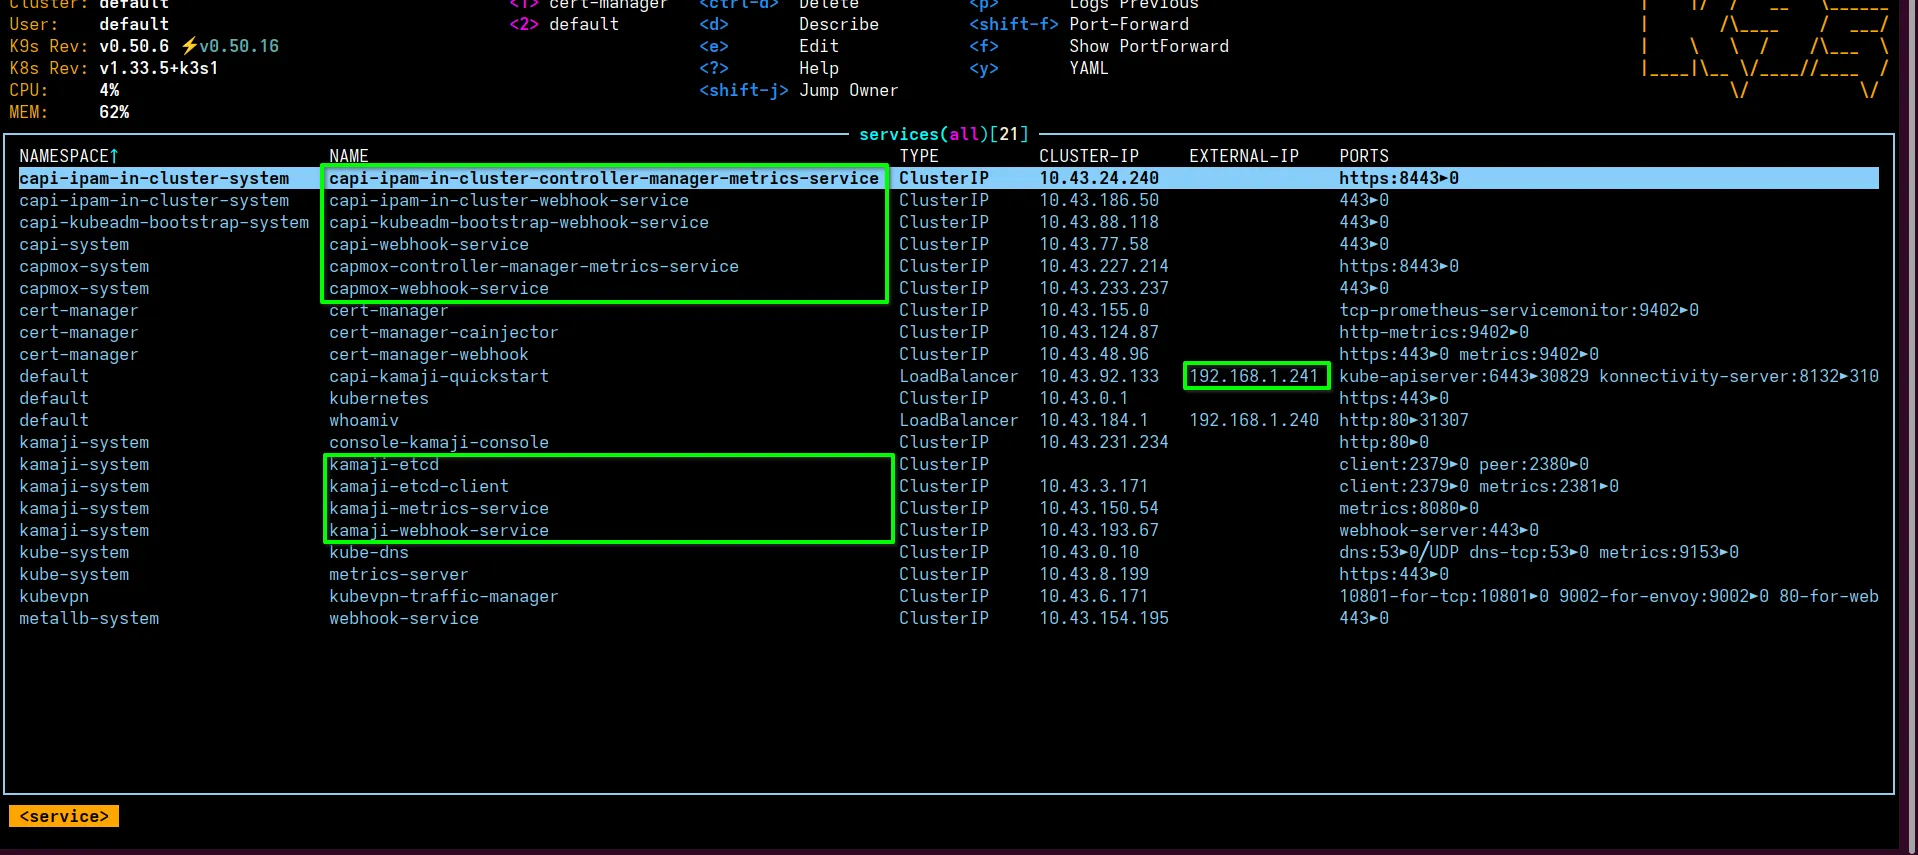
When you use a KamajiControlPlane alongside your Cluster and Machine objects, the Kamaji control-plane provider watches for that resource and spins up the Kubernetes control-plane components as Pods in your management cluster. It provisions etcd, generates and rotates certificates, and configures the API server, controller-manager and scheduler according to the specs in the KamajiControlPlane. As Pod replicas become ready, Kamaji wires them into a highly available endpoint and exposes it (ClusterIP, LoadBalancer or NodePort), while your worker nodes simply run kubeadm join against that hosted control plane, giving you a fully managed, multi-tenant control plane without requiring dedicated VMs.
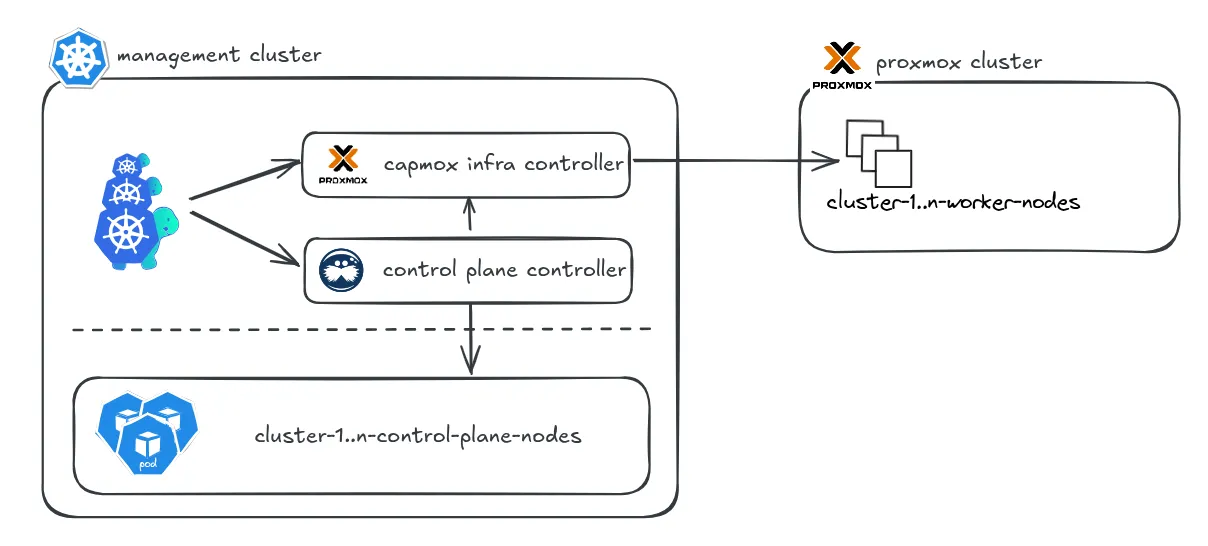 *Multiple Control Planes are running as Kubernetes Pods while their Worker Nodes are Proxmox VMs .*
1️⃣ Create Configuration for Kamaji
Before creating a tenant Kubernetes cluster, some configuration is required on the management cluster for Kamaji. Create a a file named kamaji.env, and fill it in with the following content:
# Cluster Configuration
export CLUSTER_NAME="capi-kamaji-quickstart"
export CLUSTER_NAMESPACE="default"
export CONTROL_PLANE_REPLICAS=3
export KUBERNETES_VERSION="v1.33.1"
export CLUSTER_DATASTORE="default"

# Networking Configuration
export IP_RANGE='["192.168.1.230-192.168.1.239"]'
export IP_PREFIX=24
export GATEWAY="192.168.1.1"
export DNS_SERVERS='["192.168.1.1","8.8.8.8"]'
export NETWORK_BRIDGE="vmbr0"
export NETWORK_MODEL="virtio"

# Node Configuration
export SSH_USER="<USER>"
export SSH_AUTHORIZED_KEY="ssh-rsa AAAAB..."
export NODE_REPLICAS=2
export NODE_LABELS=
export NODE_TAINTS=

# Resource Configuration
export SOURCE_NODE="pve-01"
export TEMPLATE_ID=101
export ALLOWED_NODES='["pve-01", "pve-02"]'
export MEMORY_MIB="2048"
export NUM_CORES=2
export NUM_SOCKETS=1
export BOOT_VOLUME_DEVICE="scsi0"
export BOOT_VOLUME_SIZE=20
export FILE_STORAGE_FORMAT="raw"
export STORAGE_NODE="local-lvm"

export CLOUD_INIT_CONFIG="#cloud-config package_update=true packages=- net-tools"Replace
IP_RANGE,GATEWAY,DNS_SERVERS,NETWORK_BRIDGE,SSH_USER,SSH_AUTHORIZED_KEY,SOURCE_NODE,TEMPLATE_ID,ALLOWED_NODESvalues and any other variable for that matter, so they match your environment.
2️⃣ Generate the manifests
Download the capi-kamaji-proxmox-template.yaml template file and save it in your working directory, then use the following commands to generate a cluster manifest from this template.
source kamaji.dev

clusterctl generate cluster $CLUSTER_NAME \
    --from capi-kamaji-proxmox-template.yaml \
> capi-kamaji-proxmox-cluster.yaml3️⃣ Allow CAPMOX to over-commit memory ⚠️
When the infrastructure controller provisions a new VM on Proxmox, it first sums the RAM already allocated on the target host to determine if your MachineTemplate will fit. If you haven’t explicitly enabled memory over-commit, this check will refuse to schedule any VM once the sum of allocated RAM reaches the node’s nominal capacity, causing new VMs to hang even though Proxmox could safely oversubscribe memory in practice.
For that matter, add the following properties to the ProxmoxCluster resource:
schedulerHints:
memoryAdjustment: 0For example:
apiVersion: infrastructure.cluster.x-k8s.io/v1alpha1
kind: ProxmoxCluster
metadata:
  labels:
    cluster.x-k8s.io/cluster-name: tenant-01-kamaji
  name: tenant-01-kamaji
  namespace: default
spec:
  ...
  dnsServers:
    - 192.168.1.1
    - 8.8.8.8
  ...
  schedulerHints:
memoryAdjustment: 04️⃣ Create the cluster
Execute the command:
kubectl apply -f capi-kamaji-proxmox-cluster.yaml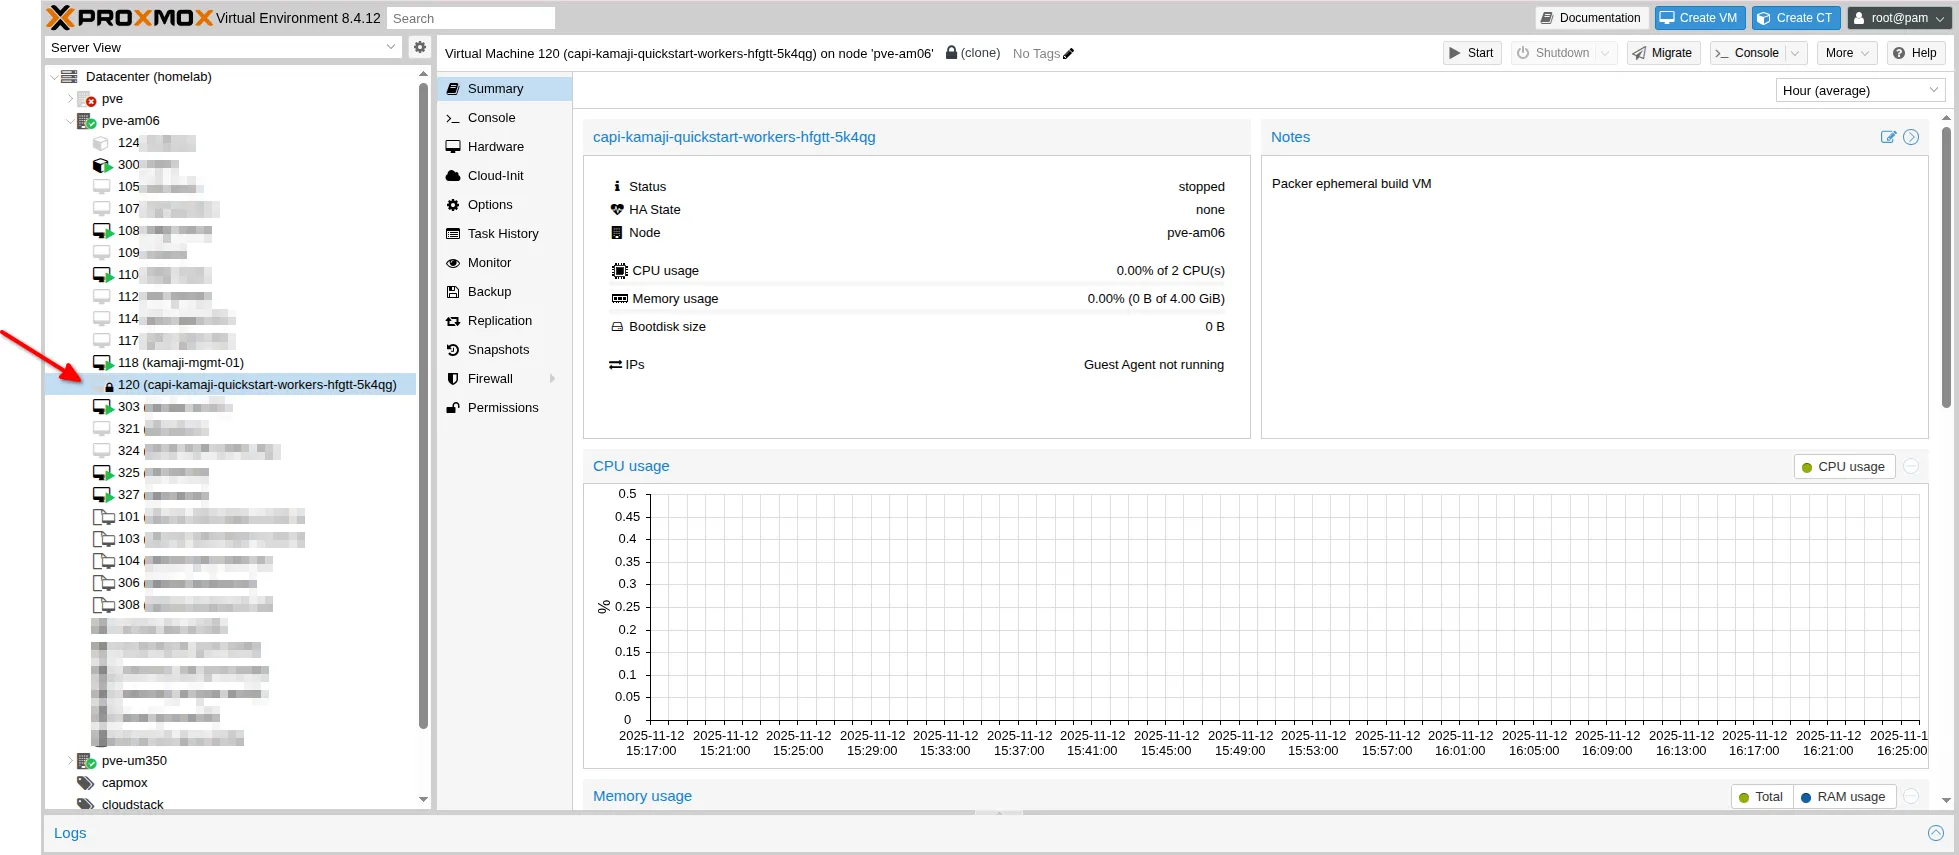 *The worker nodes are being provisioned in Proxmox.*
This process will take a few minutes. Once it completes, retrieve the kubeconfig file for the newly created cluster by running:
clusterctl get kubeconfig capi-kamaji-quickstart > capi-kamaji-quickstart.kubeconfig5️⃣ Deploy a CNI
For demonstration purposes, Calico ↗ will be deployed as the CNI for the newly created cluster. In your lab, you may choose a different CNI if preferred. Execute the following command:
kubectl --kubeconfig=./capi-kamaji-quickstart.kubeconfig \
apply -f https://raw.githubusercontent.com/projectcalico/calico/v3.26.1/manifests/calico.yamlWhen issues arise, you can access any node directly by opening an SSH session as the
rootuser. This allows you to inspect system logs, review configuration files, and run diagnostic commands on each machine.
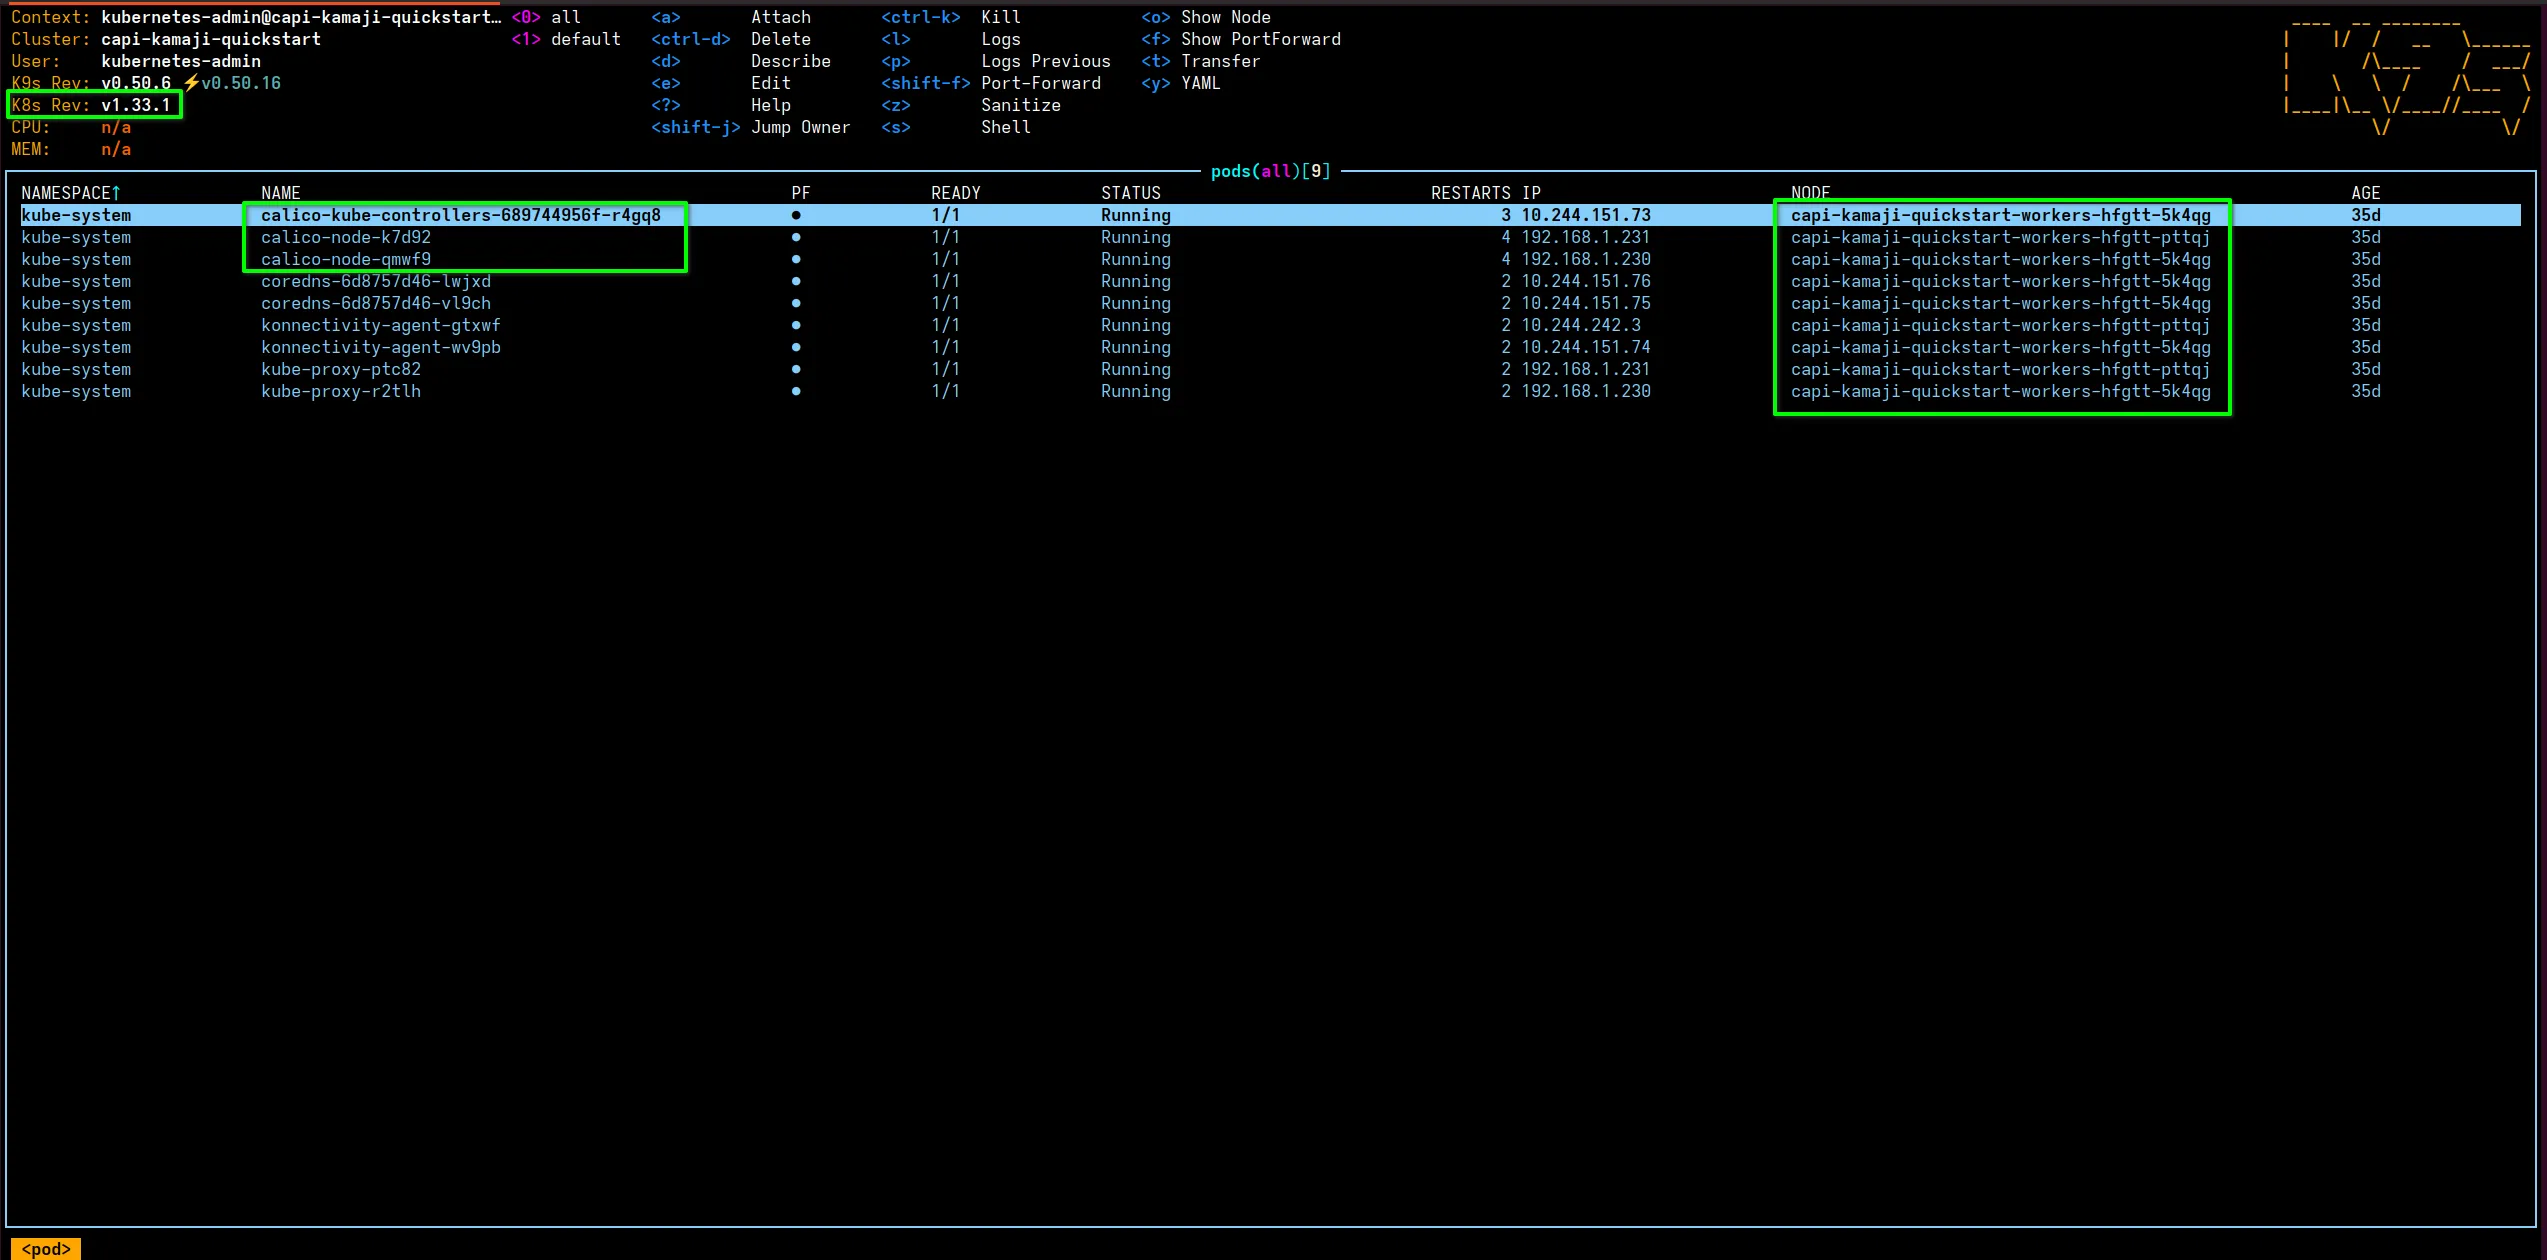 *The workload cluster is now ready for use!*
6️⃣ Install Kamaji Console (Optional)
The Kamaji Console ↗ is a web-based user interface provided by the Kamaji project to observe and manage hosted Kubernetes control planes managed by Kamaji. There is limited functionality available in the free version, but it is included here for completeness.
Before installing the console, you must provision the required Secret:
cat <<EOF | kubectl apply -f -
apiVersion: v1
kind: Secret
type: Opaque
metadata:
  name: kamaji-console
  namespace: kamaji-system
data:
  ADMIN_EMAIL: <ADMIN_EMAIL>
  ADMIN_PASSWORD: <ADMIN_PASSWORD>
  JWT_SECRET: <JWT_SECRET>
  NEXTAUTH_URL: <NEXTAUTH_URL>
EOFReplace all values of the variables under the
datastanza so they match your environment.
And then install the console via its Helm Chart:
helm repo add clastix https://clastix.github.io/charts
helm repo update

helm install console clastix/kamaji-console -n kamaji-system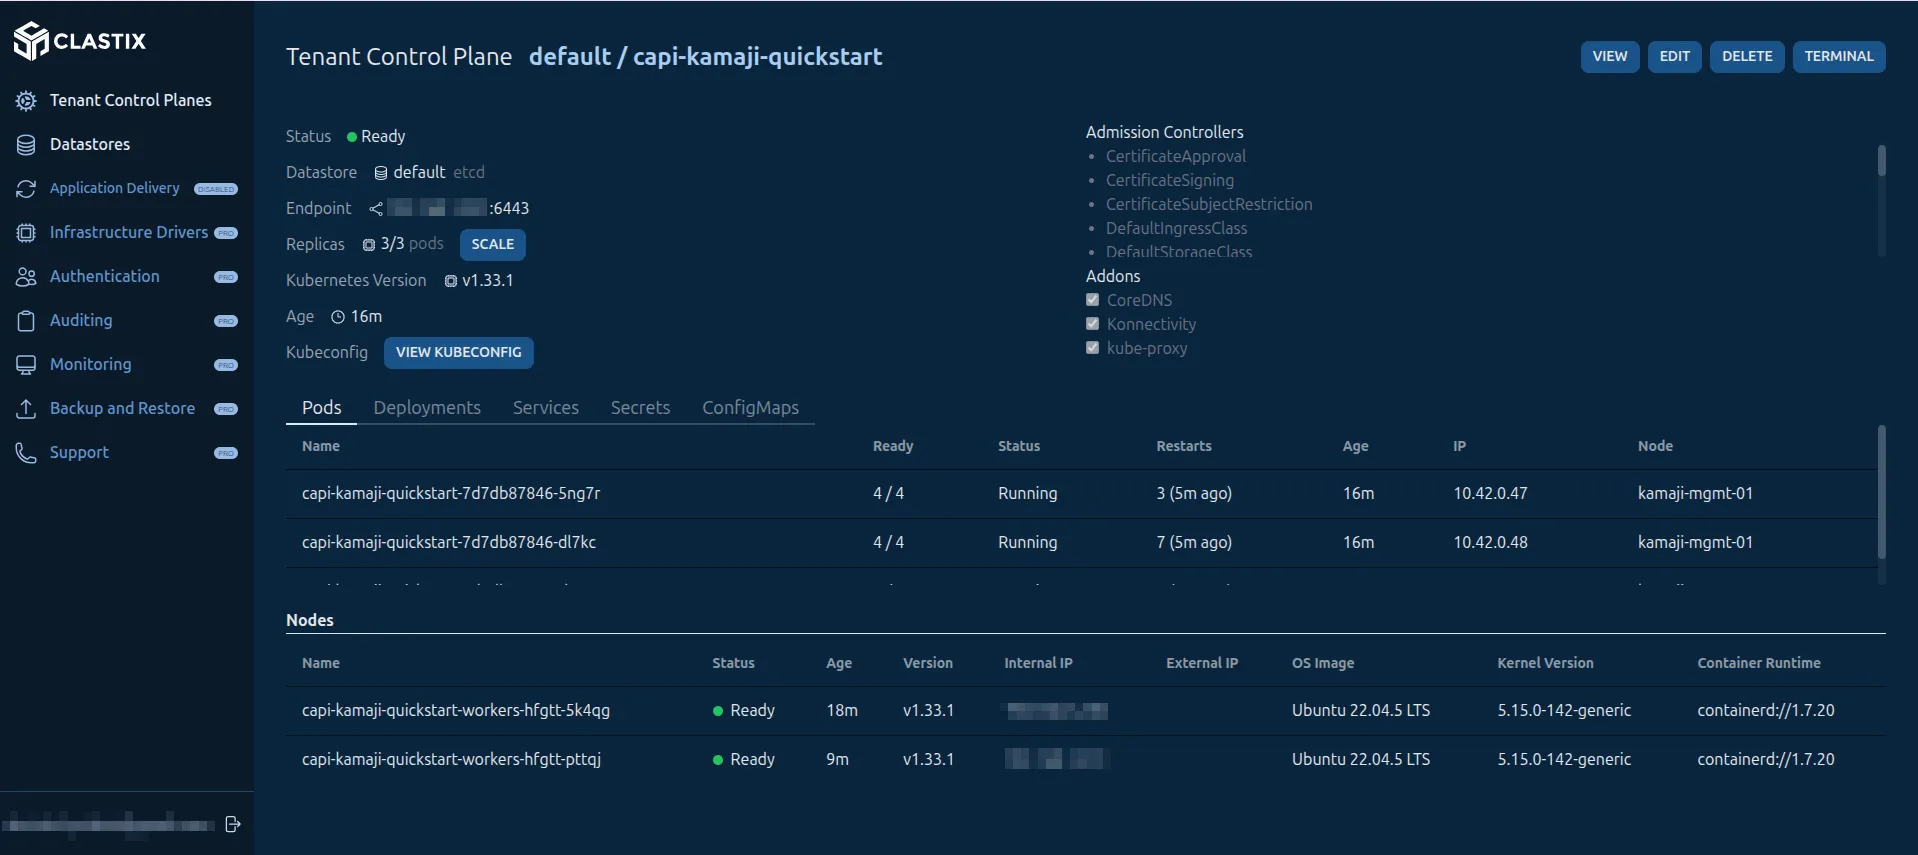
Next Steps#
In the next article, we will explore how to use Kamaji together with tools such as ArgoCD ↗ and Sveltos ↗ to take advantage of the automation capabilities provided by GitOps.
Originally published on Medium ↗